


So, you’ve decided to upgrade your automotive ride with a reverse camera (perhaps complementing a dash cam), essentially a rear-view camera system. Excellent choice! Navigating tight parking spots, backing out of driveways, or simply getting a clearer view of what’s behind you, eliminating blind spots, can transform your driving experience and provide peace of mind. And guess what? You don’t need to be a seasoned auto electrician to get this done. With a little guidance, some basic tools, and a dash of confidence, you can install a reverse camera yourself, saving a good chunk of change in labour costs.
Think of this guide as your co-pilot. We’ll break down every step, from understanding your system to the final adjustments, making sure you feel empowered and informed throughout the process. Let’s get started and give your car the eyes in the back of its head it deserves!
Understanding Your Reverse Camera System
Before we even think about grabbing a screwdriver, let’s get acquainted with your new system. Knowing what you’re working with is half the battle.
Wired vs. Wireless Systems
This is often the first decision you make when purchasing.
- Wired Systems: These are generally considered more reliable and offer a clearer, more stable, high-quality image because the video signal travels directly through a physical cable. The trade-off? More wiring to run through your vehicle. Imagine it like a direct phone call, clear and consistent.
- Wireless Systems: These transmit the video signal from the camera to the monitor via a radio frequency. They’re simpler to install in terms of running fewer long cables, but they can be susceptible to interference from other electronics, leading to occasional lag or a fuzzy picture. Think of it like a walkie-talkie, convenient, but sometimes the signal can drop. For the purpose of this guide, we’ll focus primarily on wired systems, as they offer a more robust and universal installation experience, but many steps will apply to wireless setups as well.
Component Breakdown
Let’s unpack what’s typically inside that box:
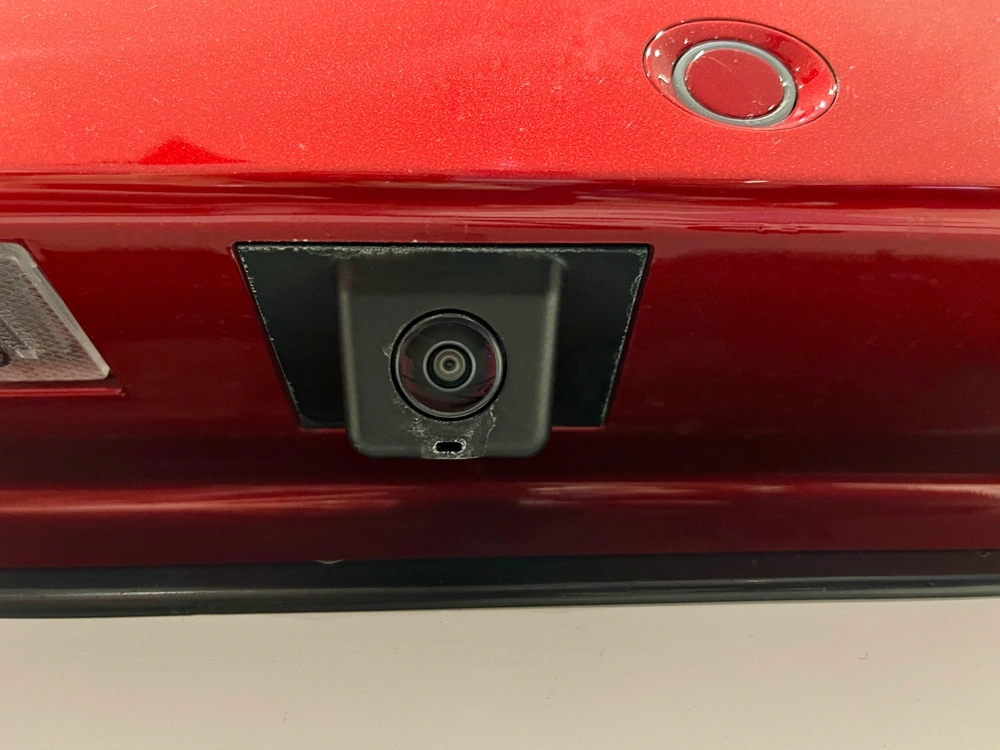
- The Camera: This is your “eye.” It might be integrated into a license plate frame, designed to replace one of your number plate lights, or a standalone unit that mounts to a flat surface. Some even feature adjustable angles, night vision for low-light conditions, and other advanced functions.
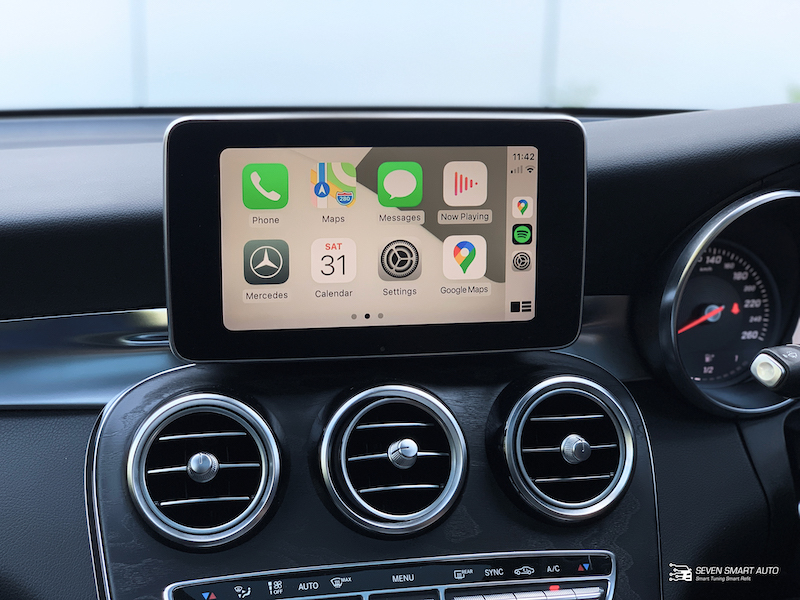
- The Monitor: This is where you see the action. It could be a small dedicated screen that clips onto your rearview mirror, mounts to your dashboard, or (if you’re lucky and have an aftermarket head unit) integrates directly into your car’s existing display.
- The Wiring Harness: This is the nervous system of your setup. It typically includes:
- Video Cable (RCA): This long cable carries the video signal from the camera to the monitor.
- Power Wires for the Camera: Usually, two wires (red for positive, black for negative) that connect the camera to a power source, often the reverse light circuit.
- Power Wires for the Monitor: Similar to the camera, these wires power the monitor. They might have a trigger wire that tells the monitor to switch on when the car is put into reverse.
- Optional Wires: Some systems include ground loops, remote trigger wires, or separate power converters. Don’t let these intimidate you; we’ll address the core connections.
Understanding these pieces means you’re already one step ahead.
Gathering Your Tools and Supplies
You wouldn’t try to bake a cake without the right ingredients, right? The same goes for this project. Having the right tools at hand will make the installation smoother, safer, and far less frustrating. Resist the urge to “make do” with a butter knife if you need a screwdriver; it rarely ends well!
Essential Hand Tools
- Screwdriver Set (Phillips and Flathead): For removing trim panels, license plates, and mounting the camera.
- Socket Wrench Set: You might need this for license plate bolts or certain interior trim fasteners.
- Plastic Trim Removal Tools: These are your best friends! They prevent damage to your car’s interior plastics when prying off panels. Avoid using metal screwdrivers for this.
- Wire Strippers/Crimpers: Absolutely essential for making clean electrical connections.
- Multimeter or Circuit Tester: Crucial for identifying the correct power wires, especially when tapping into your reverse light circuit. Don’t skip this!
- Drill (with appropriate drill bits): Only if your camera requires drilling for mounting or for running wires through a grommet. Measure twice, drill once!
Electrical Supplies
- Electrical Tape: For insulating connections and bundling wires.
- Heat Shrink Tubing (with heat gun/lighter): A more professional and durable way to insulate splices compared to tape. Highly recommended.
- Wire Connectors (T-Taps, Crimp Connectors, Solder): T-Taps are often the easiest for tapping into existing wires without cutting them. Crimp connectors are good for joining wires permanently. Solder offers the most secure connection if you’re comfortable with it.
- Zip Ties: For securing cables neatly and preventing rattles.
- Spare Fuses (appropriate amperage): It’s always wise to have a spare, just in case you accidentally short something.
- Wire Loom/Conduit: For protecting exposed wires, especially in the engine bay or under the car.
Safety Gear
- Safety Glasses: Always protect your eyes when working with tools, especially if drilling or cutting.
- Gloves: Protect your hands from grime, sharp edges, and potential electrical shocks.
- Flashlight/Headlamp: Crucial for peering into dark crevices under the dashboard or in the trunk.
Gathering these items beforehand will prevent multiple trips to the hardware store and keep your momentum going.
Pre-Installation Checks and Planning
Preparation is key. A little forethought now can save you hours of headaches later. This is where you map out your strategy.
Choosing the Right Camera Placement
This is more important than you might think.
- License Plate Mount: The most common and easiest option. It provides a good central view. Ensure it doesn’t obstruct your license plate or lights.
- Trunk Handle/Garnish Mount: Some vehicles have aftermarket cameras that integrate seamlessly into the trunk handle or trim piece above the license plate. This offers a very clean, OEM look.
- Bumper Mount: Requires drilling into the bumper. Offers flexibility but can be more exposed to bumps and scrapes.
- Existing Light Housing: Some cameras replace one of your license plate lights, offering a discreet installation.
Consider the wide-angle, visibility, and how easily you can run wires from that spot into the car’s interior. Test the camera’s field of view, if possible, by holding it in place before committing.
Mapping Your Wiring Path
This is where you envision the journey of your cables.
- From Camera to Trunk: How will the video cable and camera power wires enter the trunk? Look for existing grommets (rubber seals where other wires pass through the body) or plan to drill a small hole, ensuring it’s properly sealed afterwards.
- Through the Cabin: The main video cable needs to run from the back of the car to the front monitor. Will you run it under the carpet, along the door sills, or through the headliner? The goal is to keep it hidden, protected, and free from pinching or excessive bends. Think about where your interior trim panels meet and if there’s enough space.
- To the Monitor: Where will the monitor sit? Will the cables be hidden behind the dashboard, or will they be neatly tucked away if it’s a dash-mounted unit?
A good path avoids moving parts, heat sources, and sharp edges. Don’t just string it along; plan for longevity.
Testing Components Before Installation
This is a critical, often-skipped step. Imagine spending hours running wires only to find out the camera or monitor is dead on arrival.
- Bench Test: Before anything goes into your car, connect the camera and monitor to a 12V power source (like a car battery charger or a spare car battery) on your workbench.
- Connect the camera’s positive wire to 12V and the negative to ground.
- Connect the monitor’s positive wire to 12V and the negative to ground.
- Connect the video cable between the camera and monitor.
- If your monitor has a “trigger” wire, momentarily touch it to 12V to simulate the reverse signal.
Does the camera display an image on the monitor? Is it clear? Are there any obvious issues? If not, you’ve just saved yourself a massive headache. If yes, you’re ready to proceed with confidence.
Step-by-Step Installation Process
Alright, tools in hand, plan in mind. Let’s get this camera installed! Follow these steps carefully, and remember, patience is your greatest asset here.
Step 1: Disconnecting the Battery
This is non-negotiable. Before you touch any electrical wires in your car, disconnect the negative terminal of your car battery. This prevents accidental short circuits, electrical shocks, and potential damage to your car’s electrical system. Use a wrench to loosen the nut on the negative terminal, pull the cable off, and tuck it away from the battery post. Your safety is paramount.
Step 2: Mounting the Camera
Now for the visual. Take your chosen camera and position it where you planned.
- License Plate Camera: Remove your license plate, position the camera behind it, and reattach the license plate, securing the camera in place. Make sure the camera’s wires can pass through a small gap or existing hole.
- Other Mounts: If drilling is required, mark your pilot holes carefully, ensuring there’s nothing behind the panel you’re drilling into (e.g., fuel lines, electrical harnesses). Use a drill bit slightly larger than your camera’s wires to create a path into the trunk or tailgate. Apply silicone sealant around any drilled holes to prevent water ingress.
- License Plate Light Replacement: Carefully remove the existing license plate light housing and install the camera unit, ensuring a snug fit.
Once mounted, direct the camera’s wires into the vehicle’s interior.
Step 3: Running the Camera’s Wiring to the Front of the Vehicle
This is the most time-consuming part, so take your time and be meticulous.
- Into the Trunk/Tailgate: Feed the camera’s power wires and the main video (RCA) cable through the grommet or drilled hole into the trunk area.
- Through the Trunk Lid/Hatch: If your camera is on the trunk lid or tailgate (common on a ute), you’ll need to run the wires through the flexible rubber conduit that connects the lid to the car’s body. This protects the wires from being pinched when the lid opens and closes. You might need a wire fishing tool (a stiff wire or coat hanger) to help pull the cables through.
- Along the Interior: From the trunk, decide on your path to the front:
- Under Door Sills: Carefully pry up the plastic door sill covers using your trim removal tools. Tuck the video cable neatly underneath, making sure it doesn’t interfere with anything. Work your way from the back to the front passenger footwell.
- Under Carpet/Along Centre Console: Another option is to run it under the carpet or alongside the centre console, again, tucking it away securely.
- Headliner (less common): If you prefer, you can run it along the headliner, carefully tucking it behind the trim. This usually requires more effort.
- To the Dashboard: Once you reach the front passenger footwell, guide the cable up towards the dashboard, aiming for where your monitor will be located. Leave enough slack for connections.
Throughout this process, use zip ties to secure the cable to existing wiring harnesses or structural points, preventing rattles and keeping it tidy. Avoid sharp bends or areas where the wire could be chafed.
Step 4: Installing the Monitor
Now, let’s get your display ready.
- Placement: Decide on the final resting place for your monitor. Dashboard mounts are common, as are rearview mirror clip-ons. A dedicated dash mount offers a stable viewing experience. Ensure it doesn’t obstruct your view or airbags.
- Mounting: Attach the monitor securely using its provided mount. If it’s a dash-mounted unit, clean the dashboard surface thoroughly before applying any adhesive pads.
- Power and Video Connections:
- Connect the main video (RCA) cable coming from the camera to the corresponding input on the monitor.
- Identify the monitor’s power wires (usually red for positive, black for negative, and often a “trigger” wire).
Hold off on connecting the monitor’s power just yet; we’ll do that in a later step.
Step 5: Tapping into the Reverse Light Circuit
This is the crucial step that tells your camera and monitor to spring to life when you shift into reverse.
- Locate Reverse Light Wires:
- In the trunk area, identify the wiring harness leading to your taillight assembly.
- Have a helper put the car in reverse (with the key in the “on” position, but engine off and parking brake engaged!).
- Using your multimeter or circuit tester, probe the wires in the taillight harness one by one. The wire that shows 12V only when the car is in reverse is your target.
- Alternatively, consult your car’s wiring diagram or an online forum for your specific vehicle model to pinpoint the reverse light wire colour.
- Make the Connection:
- Once you’ve positively identified the reverse light wire, use a T-tap connector. This allows you to tap into the existing wire without cutting it. Clamp the T-tap onto the reverse light wire.
- Strip a small section of insulation from the camera’s positive power wire (red).
- Plug the stripped end of the camera’s positive wire into the T-tap.
- Connect the camera’s negative power wire (black) to a good chassis ground point nearby (e.g., a bolt connected directly to the car’s metal body). Scrape off any paint around the bolt for a good connection.
- Wireless Systems (Camera Power): If you have a wireless system, the camera itself will still need power, usually from the reverse light circuit as described above. The wireless transmitter will be integrated with the camera or connected to its power.
Step 6: Connecting the Power to the Monitor
Now to power up the screen.
- Monitor Power:
- Constant 12V (optional): Some monitors can be wired to a constant 12V source if you want the option to view the camera at any time, not just in reverse. Find a fuse in your car’s fuse box that provides constant power and use a fuse tap adapter.
- Accessory (Ignition Switched): More commonly, you’ll want the monitor to turn on with the ignition. Find an accessory wire (e.g., from your radio harness or a fuse that activates with the ignition) using your multimeter. Use a T-tap or fuse tap.
- Ground: Connect the monitor’s negative wire (black) to a good chassis ground point under the dashboard.
- Trigger Wire (if applicable): Many monitors have a dedicated “reverse trigger” wire (often green or blue). This wire tells the monitor to switch on and display the camera feed only when reverse is engaged.
- Run this trigger wire from the monitor location all the way back to the reverse light circuit you just tapped in the trunk. Connect it to the same T-tap you used for the camera’s positive wire. This is often the cleanest way to do it.
- Alternatively, if your system allows, you can sometimes tap this trigger wire into the reverse signal wire found in the car’s main wiring harness under the dash. This avoids running a long trigger wire to the back. Use your multimeter to find the reverse signal wire (it will show 12V only when in reverse).
Make sure all connections are secure and insulated with electrical tape or heat shrink tubing.
Step 7: Testing the System Thoroughly
Before putting everything back together, it’s showtime!
- Reconnect Battery: Reconnect the negative terminal of your car battery.
- Initial Test: Turn your car’s ignition to the “on” position (engine off).
- Shift to Reverse: Engage the parking brake, press the foot brake, and shift your car into reverse.
- Check Display: Does the monitor turn on? Does it display the image from the camera?
- Check Clarity: Is the image clear? Are there any lines or flickering?
- Shift Out of Reverse: Does the monitor turn off or switch back to its previous input?
If everything works as expected, give yourself a pat on the back! If not, don’t panic. Move to the troubleshooting section.
Finishing Touches and Troubleshooting
You’re almost there! A few final steps will ensure your installation is professional and robust.
Securing Wires and Reassembling Trim
This is where you make your work invisible.
- Tidy Up: Use zip ties to neatly bundle all loose wires, securing them to existing harnesses or vehicle structures. Ensure no wires are dangling, can get caught in moving parts, or are subjected to excessive tension.
- Protect Connections: Double-check all electrical connections. If you used electrical tape, ensure it’s wrapped tightly and completely covers the splice. If you used heat shrink, ensure it’s fully shrunk and sealed. Consider adding wire loom or conduit to any wires that might be exposed to abrasion or heat.
- Reassemble Trim: Carefully reinstall all the interior trim panels you removed. Ensure all clips align and click back into place. Don’t force anything; if it’s not fitting, check for pinched wires or misaligned clips. This step is where those plastic trim removal tools truly shine, helping you avoid unsightly pry marks.
A clean installation not only looks better but also prevents future issues from loose or damaged wiring.
Common Issues and How to Fix Them
Even with the best planning, sometimes things don’t go perfectly. Here are a few common hiccups:
- No Image on Monitor / Monitor Doesn’t Turn On:
- Check Power: Is the monitor receiving power? Use your multimeter to check for 12V at the monitor’s power input.
- Check Ground: Is the monitor’s ground connection secure?
- Check Trigger Wire: Is the reverse trigger wire correctly connected and receiving 12V when in reverse?
- Check Camera Power: Is the camera receiving power from the reverse light circuit? Use your multimeter.
- Check Video Cable: Is the RCA video cable securely connected at both ends? Try reseating it. Is it damaged?
- Fuse: Check if any fuses (car’s or an inline fuse you installed) have blown.
- Flickering / Distorted Image:
- Loose Connections: Recheck all video and power connections.
- Ground Loop Issue: Sometimes, different ground points can cause interference. Ensure the camera and monitor share a common, clean ground. A ground loop isolator can sometimes fix this, available at electronics stores.
- Interference (Wireless Systems): Try repositioning the wireless transmitter/receiver, or look for sources of electromagnetic interference nearby (e.g., faulty LED lights, other electronics).
- Damaged Cable: Inspect the video cable for kinks or damage.
- “No Signal” Message:
- This usually indicates the monitor is on but not receiving a video signal. Recheck the video cable connections and ensure the camera is powered.
Patience and methodical troubleshooting (checking one thing at a time) will help you pinpoint the issue.
Adjusting Camera Angle and Monitor Settings
Finally, personalise your view.
- Camera Angle: Most cameras allow for some degree of vertical angle adjustment. With the car in reverse, test different angles to find the one that gives you the best view. You want to see enough of your bumper to judge distance, but also a good view of the ground behind the back of your vehicle.
- Monitor Settings: Your monitor likely has brightness, contrast, and possibly colour settings. Adjust these to your preference, ensuring the image is clear and easy to see in various lighting conditions (day and night). Some monitors also have parking guide lines that can be adjusted or turned off.
Wrapping Up Your Car Reverse Camera Installation
You’ve done it! Installing a reverse camera might seem daunting at first glance, but by breaking it down into manageable steps and approaching it systematically, you’ll equip your vehicle with a valuable safety and convenience feature, often found in new cars, potentially without voiding your warranty if done correctly. Not only have you saved money, but you’ve also gained a deeper understanding of your car’s electrical system and the satisfaction of a DIY accomplishment.
Now, enjoy the newfound confidence that comes with having a clear view of what’s behind you. For more automotive tips, tools, and high-quality reverse camera systems, visit Seven Smart Auto and upgrade your driving experience today!